Guide and Resources
This guide provides a starting point for using the Smart System Platform. Get an idea about the platform and its functionality, how to get started with the management and development tools and find information on related projects, supporting materials, and resources linked below.
Orientation
Getting started can be overwhelming, so here is a quick overview of the topics we go into below. We suggest you start with the Concept & Platform Overview chapter to get an idea about the Smart System Platform, its architecture, purpose and functionalities, before getting started, aided by the Getting started with the Smart System Platform chapter.
Concept & Platform Overview
The Smart System Platform (SSP) is a minimum viable product (MVP) of a networking-enabled development and education platform based on Smart Motors, designed to foster hands-on learning, learning through play, and collaborative learning. It aims to provide accessible and inclusive technology for all, addressing challenges like cost and usability often associated with educational robotics, as highlighted in research by Dahal (2024) and others. Inspired by Constructionism by Papert & Harel (1991) and Constructivism by Von Glasersfeld (1982).
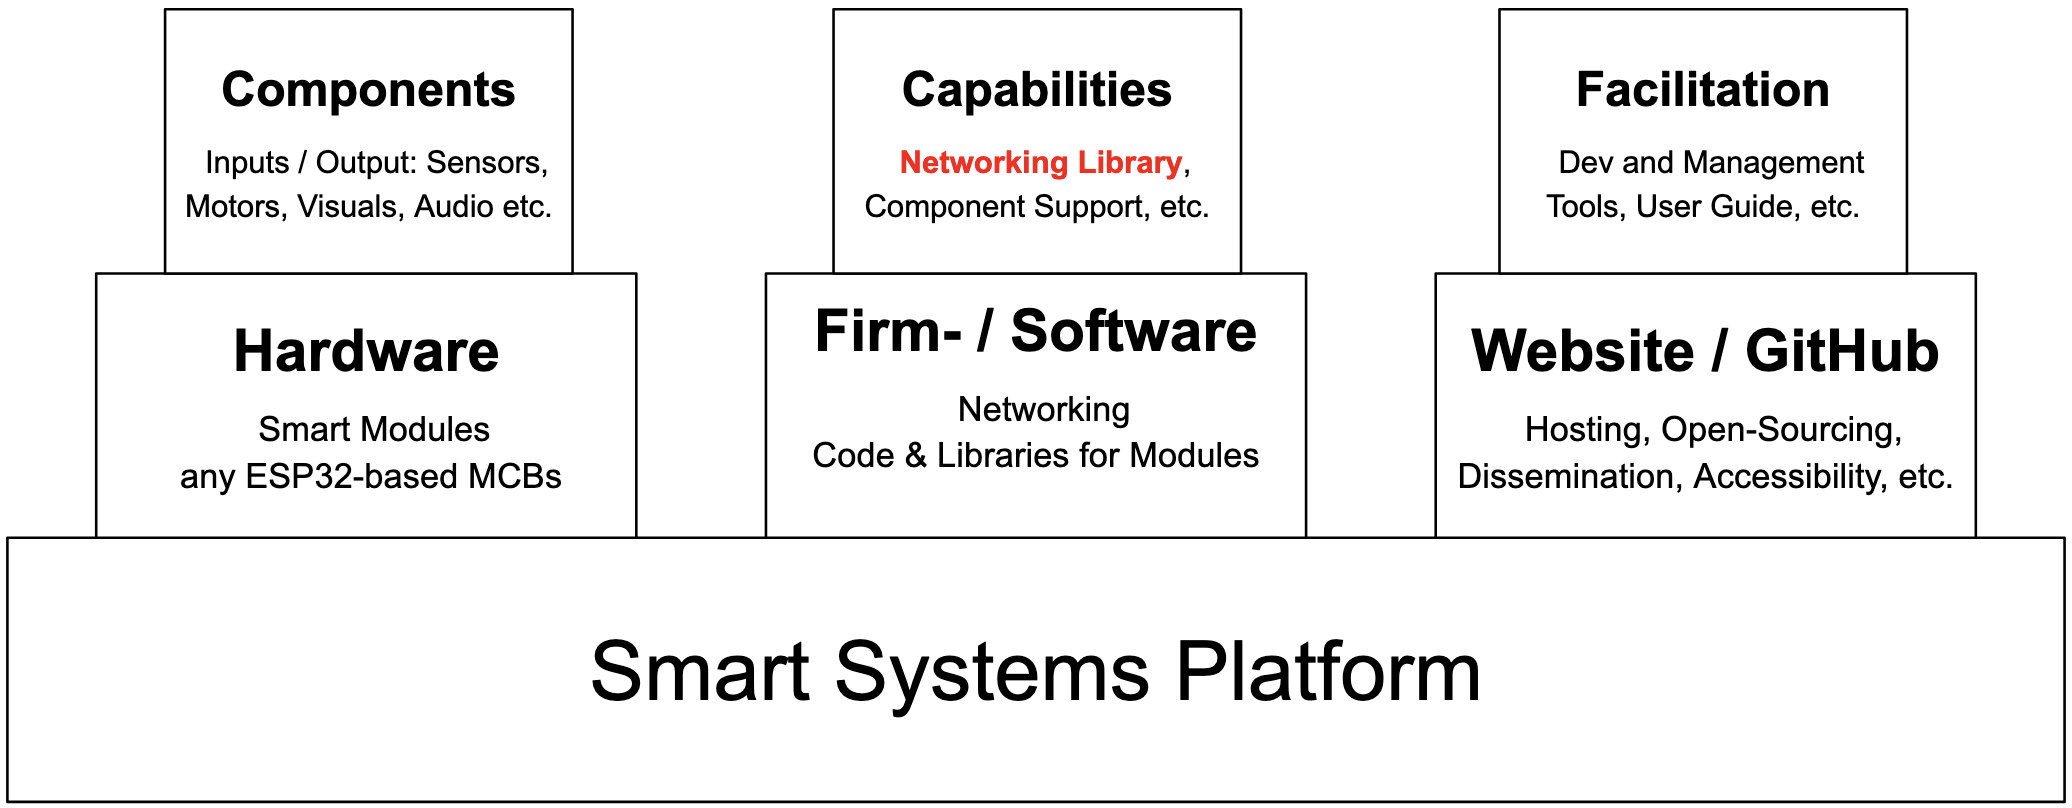
The Smart System Platform, designed around the core networking capability, is split into three sections. The hardware, which includes the Smart Motors inspired hardware, named Smart Modules, software, including the Networking Library, various component support libraries and the main program codes, and documentation, which inlcudes the GitHub page, the website, as well as the various supportive tools developed for the use, management and development using the Smart System Platform.
Getting Started with the Smart System Platform
An overview of the various software tools available to support your development and management of the Smart System Platform.
Configuring Smart Modules Using the Network Management UI
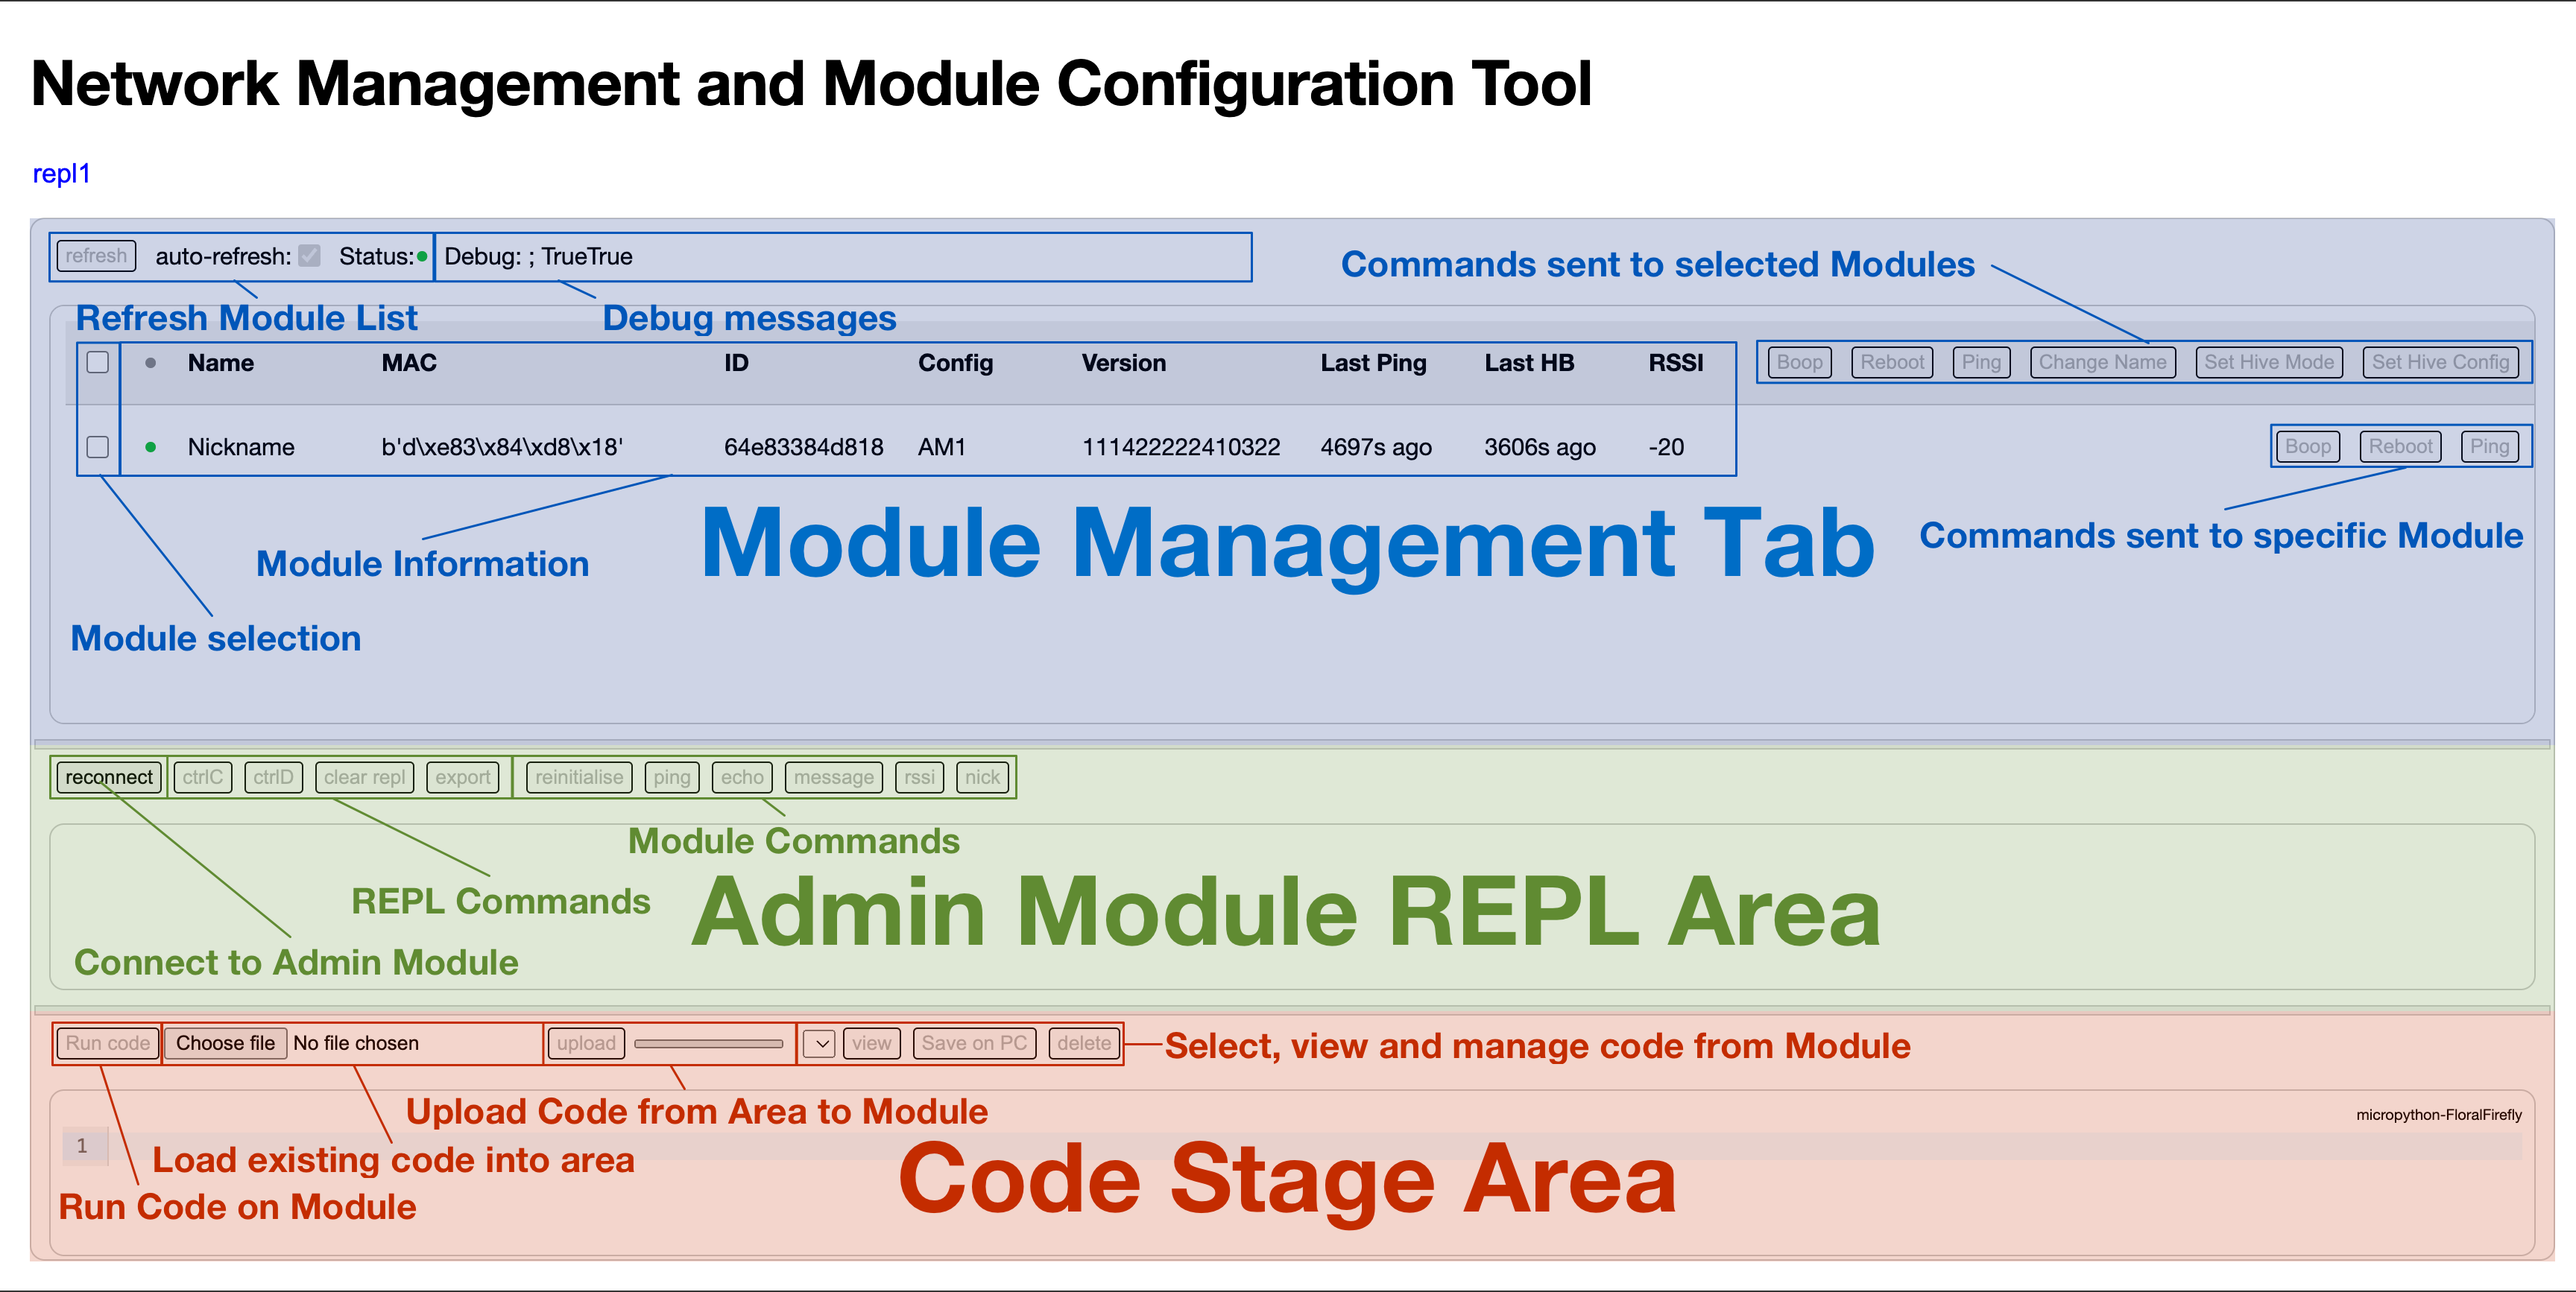
The Network Management and Module Configuration Tool allows you to configure and manage your modules, including configuring them for custom interconnected operations.
Page Overview:
Step 1: Load Page and Connect
In a first step, load the Network Management and Module Configuration Tool page in the Chrome browser, and connect your Admin Module to your device via USB-C cable.
Step 2: Connect Admin Module to Page
Connect to the Admin Module using the connect button in the REPL Area. Once successfully connected, the greyed out command buttons become active, and the REPL area will display the chip name. The main code of the Admin Module should automatically start, which will be indicated by a regularly occuring heart-beat message.
Troubleshooting: If the command buttons remain greyed out, simply disconnect and reconnect to the device using the disconnect and connect buttons. If the REPL area only displays a blinking block instead of >>>, unplug your Admin Module, replug and try again. If the issue persists, reset your Admin Module using the reset button on the ESP32 SoC-based MBC.
Step 3: Ping and Refresh Module List
Per default,the module list is set to refresh automatically. However, no devices will show up unless the Admin Module has received communications from the device. To find all active modules in your vicinity, you can send out a ping command, to which all active modules will automatically respond with their respective information. The module list will then be updated accordingly.
Troubleshooting: Ensure that your Modules are all turned on and running their default code. If a device is not found, turn it off and on again.
Step 4: Usage
Use the available commands to configure and manage your network of modules in real-time. An easy way to try this without any danger of breaking something is to change the name of a selected module.
Step 5: Module Configuration
The main use of the page is to configure your modules for wireless interaction. You can do so by clicking the configure Set Hive Config button and setting your configuration accordingly. Select the module you would like to configure by clicking its checkbox, and then press the Set Hive Config button. A pop-up window will appear, asking for the mac addresses of modules the module should send its data to. Enter a list of mac addresses here, including the square brackets [], or otherwise for none, leave the field empty. A further pop-up will appear, asking for the mac and respective sensor which the device should expect data from and use for its own output calculation. The format to enter this is as follows: [[mac1, "sensor"], [mac2, "button"]. A table with the modules and their possible inputs and their outputs is listed below. When using multiple data providers, the device will use an average of the normalized data it has received. A further pop-up appears asking for the refresh rate, 100 ms is a good value for this. The subsequent pop-up window asks for the mode, here either logic or continuous can be entered, logic meaning the device will use True/False (rounding discrete values to either 0 or 1), while continuous will calculate a discrete value to be mapped to the output. The next pop-up will ask for sudo authentication, to bypass this enter True. In the REPL a log message sending the message should appear, and if received and successful, a success message should be received from the configured module. If the message was received but the configuration change failed, a fail message will be returned. If no message is returned, this is an indicator that the recipient has not received the message.
| Module Name | Input(s) | Output(s) |
|---|---|---|
| Admin Module |
|
|
| Smart Motor v3 |
|
|
| Smart Splat |
|
|
| Smart Light |
|
|
| Smart Button |
|
|
Step 6: AI Module Configuration Assistant
In an effort to the aid with the calculation of the required configuration values for the modules, an AI chatbot has been primed to take in a description of intended network configuration, to which it will return the required command values for the various modules. The primed LLM is linked below.
Step 7: Advanced Management
In the basic version of the tool, only a limited amount of commands has been made available as an introduction, though an experimental version with the full suite of networking commands is linked below.
Developing Networked Smart System Platform Projects with the Custom Web IDE
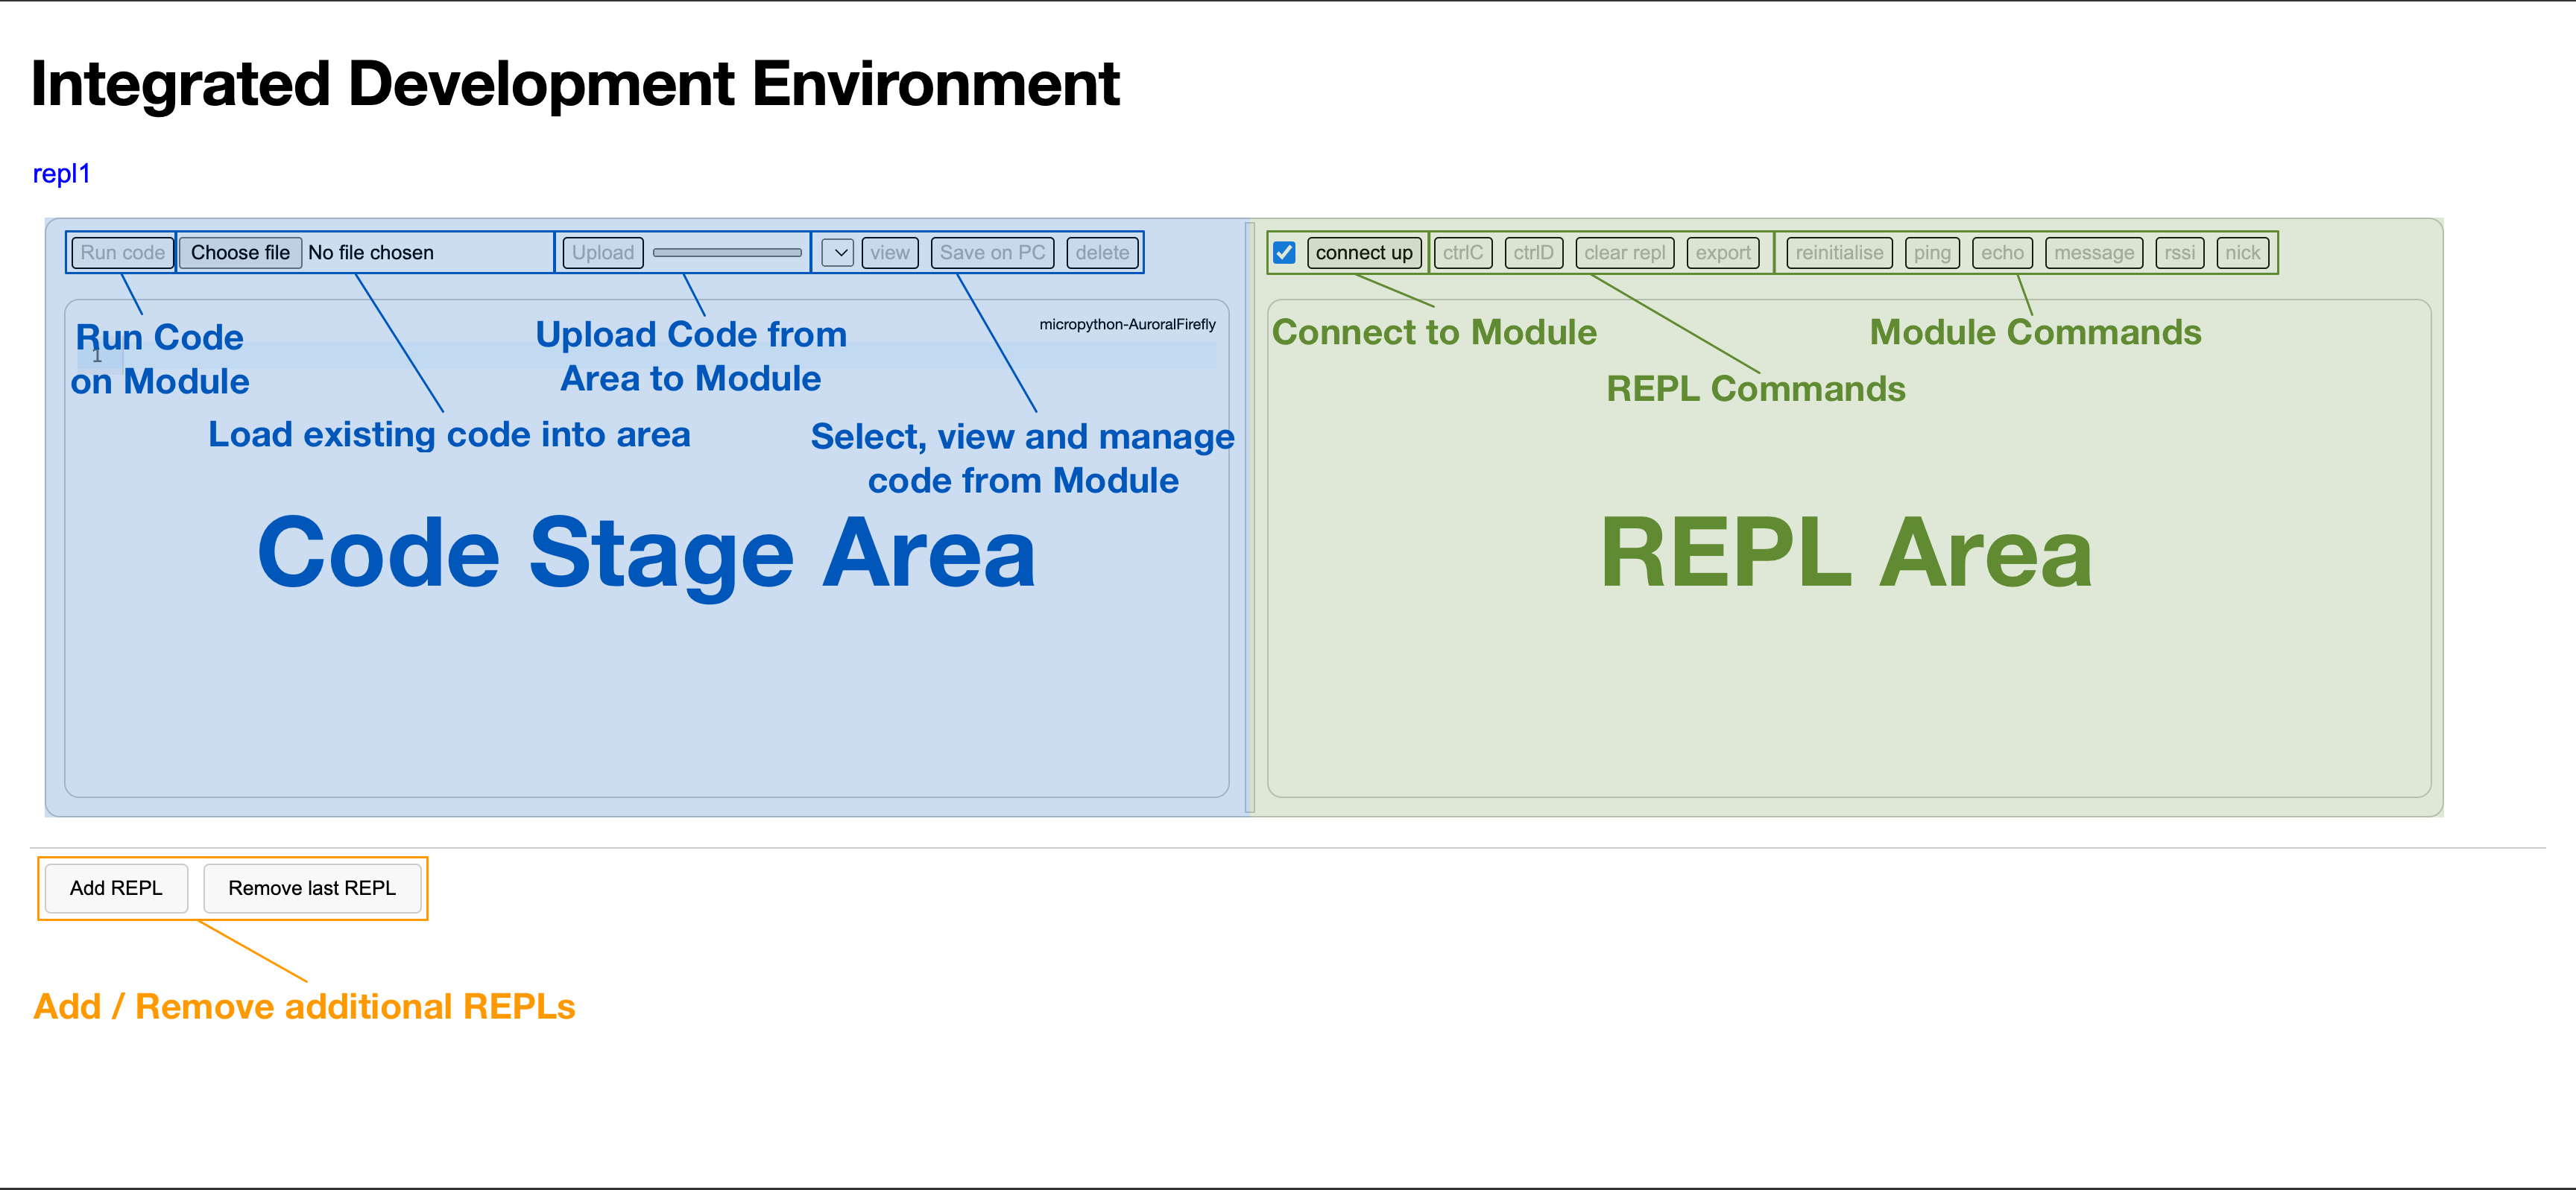
A custom IDE has been developed using PyScript. This IDE allows you to write and execute Python code directly in your web browser, without the need for software installation. It supports multiple development tabs, making it easier to manage complex projects with multiple networked devices.
Page Overview:
Step 1: Load Page and Connect
In a first step, load the Custom Web IDE page in the Chrome browser, click the add REPL button, and connect a Module to your device via USB-C cable.
Troubleshooting: If no IDE field appears on the webpage, wait for 10 seconds and then try clicking the add REPL button again.
Step 2: Connect Module to Page
Connect to the Module using the connect button in the REPL Area. Once successfully connected, the greyed out command buttons become active, and the REPL area will display the chip name or the running code, if the do not interrupt checkbox was checked.
Troubleshooting: If the command buttons remain greyed out, simply disconnect and reconnect to the device using the disconnect and connect buttons. If the REPL area only displays a blinking block instead of >>>, unplug your Module, replug and try again. If the issue persists, reset your Module using the reset button on the ESP32 SoC-based MBC.
Step 3: Develop!
Happy coding! Don't forget to comment out or remove the boot.py when testing your code. For your convenience and ease of use of the Networking Library, there is a, which reinitialises the Networking library, which then allows you to use all the networking commands included in the IDE. It is further possible to load the example.py file in the code stage area, by clicking the load example.py button. The example.py can also be found below, and offers code examples to get you started with the Networking Library:
import time
# Network
from ssp_networking import SSP_Networking

# Initialise
infmsg = True
dbgmsg = False
errmsg = True
networking = SSP_Networking(infmsg, dbgmsg, errmsg)

print(f"{(time.ticks_ms() - networking.inittime) / 1000:.3f} Networking Example: Running example.py")
print()


###Example code###

recipient_mac = b'\xff\xff\xff\xff\xff\xff'  # This mac sends to all
message = b'Boop'

# Print device networking configuration
print(f"{(time.ticks_ms() - networking.inittime) / 1000:.3f} Networking Example: Config: {networking.config}")
print()


#Command Types:
# Ping, calculates the time until you receive a response from the peer and adds their infor to the networking address book
networking.ping(recipient_mac)
print()

# Echo, sends a message that will be repeated back by the recipient
networking.echo(recipient_mac, message)
print()

# There are a bunch of more command types, the complete list can be found in the config.py or ssp_networking.py


#Message Type
# Message, sends the specified message to the recipient, supported formats are bytearrays, bytes, int, float, string, bool, list and dict, if above 241 bytes, it will send in multiple packages: max 60928 bytes
networking.send(recipient_mac, message)
print()

# Check if there are any messages in the message buffer, returns True or False
print(f"{(time.ticks_ms() - networking.inittime) / 1000:.3f} Networking Example: {networking.check_messages()}")
print()

# Get Last Received Message
print(f"{(time.ticks_ms() - networking.inittime) / 1000:.3f} Networking Example: {networking.return_message()}")  # Returns none, none, none if there are no messages
print()


#Other
# Get the RSSI table
print(f"{(time.ticks_ms() - networking.inittime) / 1000:.3f} Networking Example: {networking.rssi()}")
print()


#IRQ
# Set up an interrupt which runs a function as soon as possible after receiving a new message
def receive():
    for mac, message, rtime in networking.return_messages():  # You can directly iterate over the function
        print(f"{(time.ticks_ms() - networking.inittime) / 1000:.3f} Networking Example: Received {message} from {peer_mac} at {rtime}")

networking.irq(receive)  # interrupt handler


#Add-Ons
from machine import Pin, SoftI2C
#Screen
import ssd1306

i2c = SoftI2C(scl=Pin(7), sda=Pin(6))
oled = ssd1306.SSD1306_I2C(128, 64, i2c)
oled.fill(0) #set blank screen
oled.show() #write to screen
oled.text("example.py", 0, 28, 1) #set text
oled.show() #write to screen

#set up sensors
import sensors
sens = sensors.SENSORS()
point = sens.readpoint()
sensor_data = {}
sensor_data["sensor"] = point[0]
sensor_data["potentiometer"] = point[1]
print(f"{(time.ticks_ms() - networking.inittime) / 1000:.3f} Networking Example: Sensor data: {sensor_data}}")

#set up servo
import servo
s = servo.Servo(Pin(2))
angle = 180 #0 to 180
s.write_angle(angle)

#buttons
from machine import Pin
switch_down = Pin(8, Pin.IN)
switch_select = Pin(9, Pin.IN)
switch_up = Pin(10, Pin.IN)

#You could set up a function that sends a message to all and is called when the select button on the dahal board is pressed
lastPressed = 0

def boop(pin):
    global lastPressed
    if (time.ticks_ms() - lastPressed > 1000): #prevents button to be called multiple times within 1 second
        lastPressed = time.ticks_ms()
        networking.send(recipient_mac, "Hewwo!")
        print(f"{(time.ticks_ms() - networking.inittime) / 1000:.3f} Networking Example: Sent {message} to {peer_mac}")

switch_select.irq(trigger=Pin.IRQ_FALLING, handler=boop)
Troubleshooting: File uploading for larger files is prone to break. Furthermore, viewing and uploading files while the module is executing code will likely break the module and page. Reloading of the webpage becomes necessary should this occur.
Step 4: AI Code Assistant
In an effort to aid with the development and coding using the SSP-specific networking and other libraries, an AI chatbot has been primed on code documentation, which should be able to provide you with basic code blocks and functionalities to aid in your development efforts. The primed LLM is linked below.
Managing Smart Modules with the Module Management Portal

The Module Management Portal allows you to easily update the software on your modules. It checks the config.py file for versions numbers against the latest config.py file on the release branch of the GitHub. If a discrepancy exists the respective files are downloaded directly onto the device from GitHub, updating the software on the device to its newest version, based on its specific configuration.
Useful Resources
Smart Motors
The original Smart Motors notion page. Provides documentation, guides, and resources to help you understand and utilise the original Smart Motors, which forms the basis for the Smart System Platform.
Smart Motors
The new Smart Motors webpage. Provides documentation, guides, and resources to help you understand and utilise the original Smart Motors, which forms the basis for the Smart System Platform.
MicroPython WebREPL
Provides a MicroPython interactive interpreter directly in your web browser, allowing wireless access to a webREPL-enabled device on your local network.
Thonny
A beginner-friendly Python IDE that provides a user-friendly interface and debugging tools, which is fully compatible with the ESP32-SoC-based hardware and MicroPython code of the Smart Modules.
Smart Motor GitHub
Link to the Smart Motors GitHub
Smart System Platform GitHub
Link to the Smart System Platform GitHub
Smart Playground GitHub
Link to the Smart Playground GitHub
Smart App
Link to the Smart App webpage